Mẹo Hướng dẫn What are the expiration policy options you can specify for content in a rights policy template? Chi Tiết
Bùi Thị Vân Thiện đang tìm kiếm từ khóa What are the expiration policy options you can specify for content in a rights policy template? được Cập Nhật vào lúc : 2022-09-04 21:36:02 . Với phương châm chia sẻ Mẹo về trong nội dung bài viết một cách Chi Tiết 2022. Nếu sau khi Read tài liệu vẫn ko hiểu thì hoàn toàn có thể lại phản hồi ở cuối bài để Ad lý giải và hướng dẫn lại nha.Introduction
Active Directory Rights Management Services (AD RMS) Data leakage is the unauthorized transmission of information – either to people within the organization or people outside the organization – who should not be able to access that information. One of the major advantages of using AD RMS over other security features such as NTFS permission is that AD RMS permission travels along with the documents.
Nội dung chính- IntroductionWhen to use AD RMS?AD RMS templates support the following rights:“You must sign out before you can manage AD RMS”“Next step, let’s Configure the rights policy template Distribution” Now, you have successfully configured AD RMS templates.Verifying AD RMS Client
That’s all for now. 🙂Which of the following is a feature that allows non domain joined devices to access claims based resources?Which option will allow private keys to be locked away and then restored if the user's private key is lost?What tool can a user use to request certificates that are not configured for autoenrollment?Which of the following is the first step to allow third party devices to perform device registration to access domain resources from the Internet?
AD RMS integrates with existing Microsoft products and OS including Windows Server, Exchange Server, SharePoint Server, Microsoft Office Suite and Microsoft Azure.
AD RMS can protect data in transit and rest. For example, AD RMS can protect documents that are sent as email messages by ensuring that a message cannot be opened even if it is accidentally addressed to the wrong recipient.
When to use AD RMS?
For example, you Finance Manager copies a spreadsheet file containing the compensation packages of an organization’s executives from a protected thư mục on a file server to the Manager’s personal USB drive. During the commute home, the Manager leaves the USB drive on the train, where someone with no connection to the organization finds it. Without AD RMS, whoever finds the USB drive can open the file. With AD RMS, it is possible to ensure that the file cannot be opened by unauthorized users.
AD RMS uses rights policy templates to enforce a consistent set of policies to protect content. When configuring AD RMS, you need to develop strategies to ensure that users can still access protected content from a computer that is not connected to the AD RMS cluster.
You also need to develop strategies for excluding some users from being able to access AD RMS – protected content, and strategies to ensure that protected content can be recovered in the sự kiện that it has expired, the template has been deleted, or if the author of the content is no longer available.
Rights policy templates allow you to configure standard methods of implementing AD RMS policies across the organization.
For example, you can configure standard templates that grant view-only rights, block the ability to edit, save, and print, or if used with Exchange Server, block the ability to forward or reply to messages.
AD RMS templates support the following rights:
Full Control: Gives a user full control over an AD RMS – protected document.
View: Gives a user the ability to view an AD RMS – protected document.
Edit: Allows a user to modify an AD RMS – protected document.
Save: Allows a user to use the Save function with an AD RMS – protected document.
Export: (Save as). Allows a user to use the Save As function with an AD RMS – protected document.
Print: Allows an AD RMS – the protected document to be printed.
Forward: Used with Exchange Server. Allows the recipient of an AD RMS – protected message to forward that message.
Reply: Used with Exchange Server. Allows the recipient of an AD RMS – protected message to reply to that message.
Reply All: Used with Exchange Server. Allows the recipient of an AD RMS–protected message to use the Reply All function to reply to that message.
Extract: Allows the user to copy data from the file. If this right is not granted, the user cannot copy data from the file.
Allow Macros: Allows the user to utilize macros.
View Rights: Allows the user to view assigned rights.
Edit Rights: Allows the user to modify the assigned rights.
 For this Demo, as usual, I still am using my existing small Infrastructure which is DC_Server.NewHelpTech.lk and SUB_Server01.NewHelpTech.lk.
1 – Let’s start by Creating AD RMS Service Account on Domain Server (Service account – Microsoft recommends using a standard domain user account with additional permissions. You can use a managed service account as the AD RMS service account).

2 – On the DC-Server server, open Active Directory User & Computers and Create New OU call Service Accounts.


3 – Next, Create New User call ADRMSVC with the complete password.


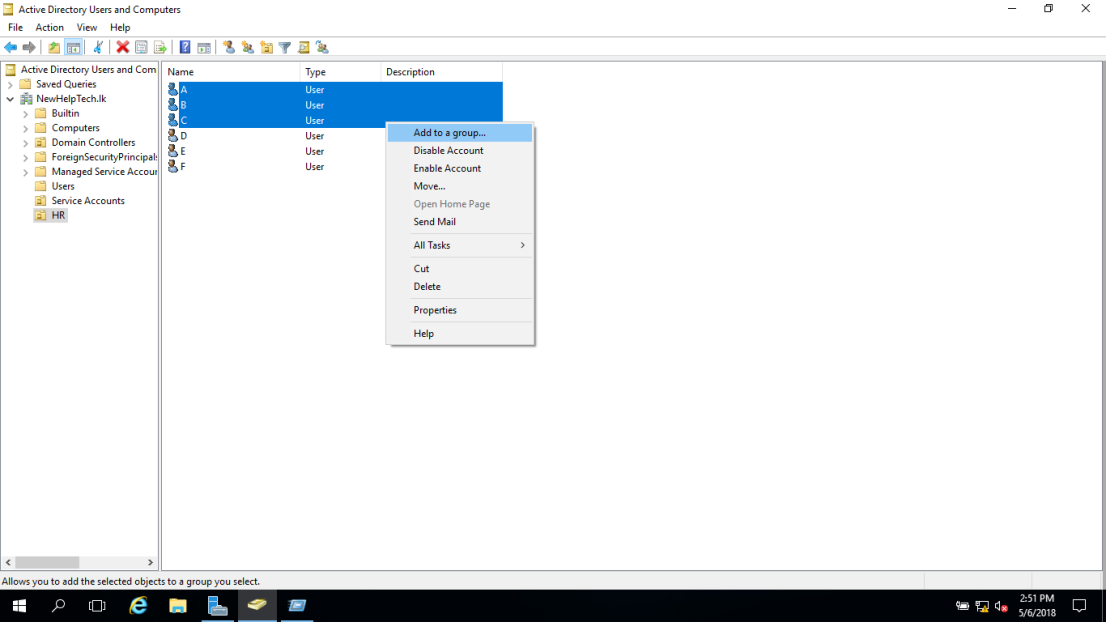
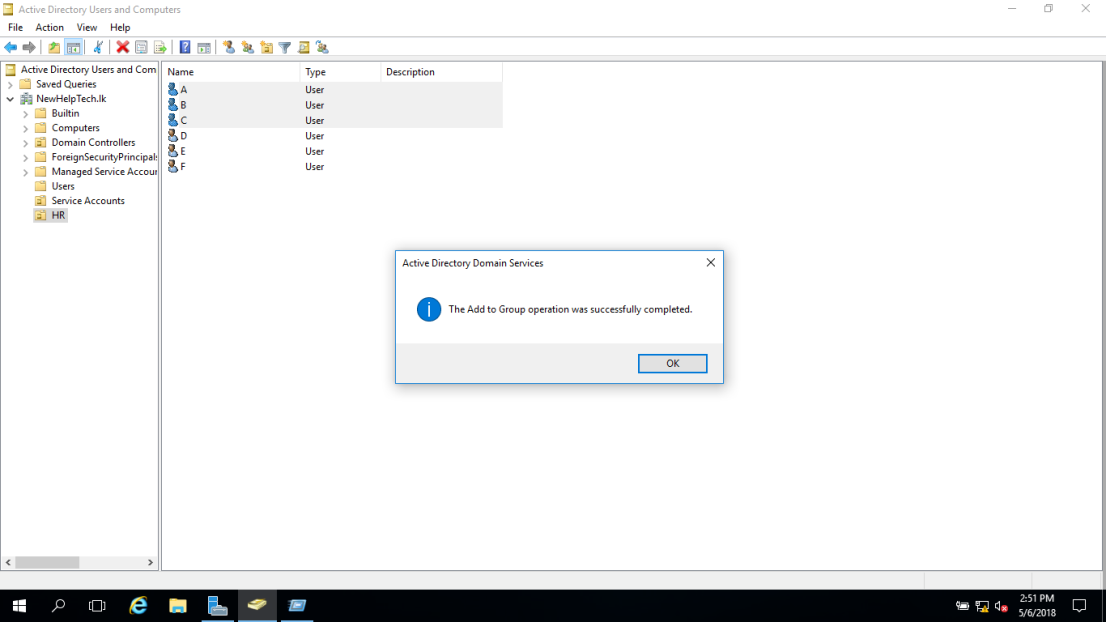
4 – Next, Create New Group in Users container call ADRMS_SuperUsers and Create another Group call Executives.


5 – Next, Add few users to Executives group, for this Demo I choose My Four of my HR users to join the Executive group.


6 – Next, still on the DC-Server, Open the DNS Manager and Add New Host call ADRMS with SUB-SERVER-01 IP Address, On the DNS Manager, right-click NewHelpTech.lk and click New Host (A or AAAA).

7 – In the New Host box, enter the following information, and then click Add Host:
- Name: ADRMSIP address: 172.16.1.200
Click OK, and then click Done.


 Orait, we now successfully Add new ADRMS Users & Groups to the AD and also configure DNS so that New ADRMS resource record created.
8 – Next, log in to SUB-SERVER-01.NewHelpTech.lk to start to Install and configure the AD RMS server role.
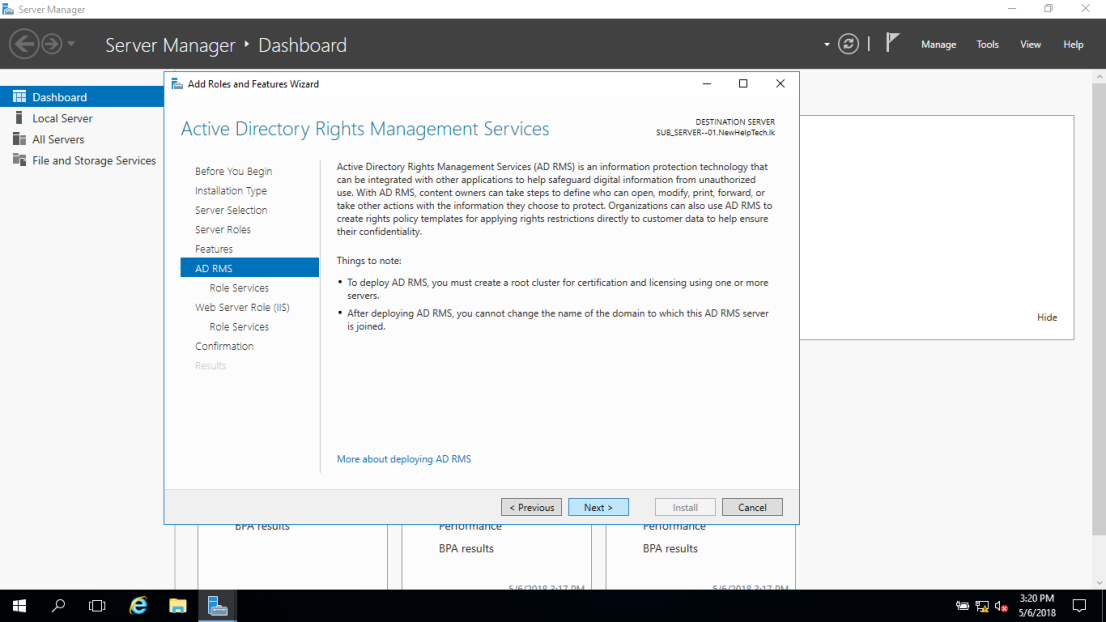
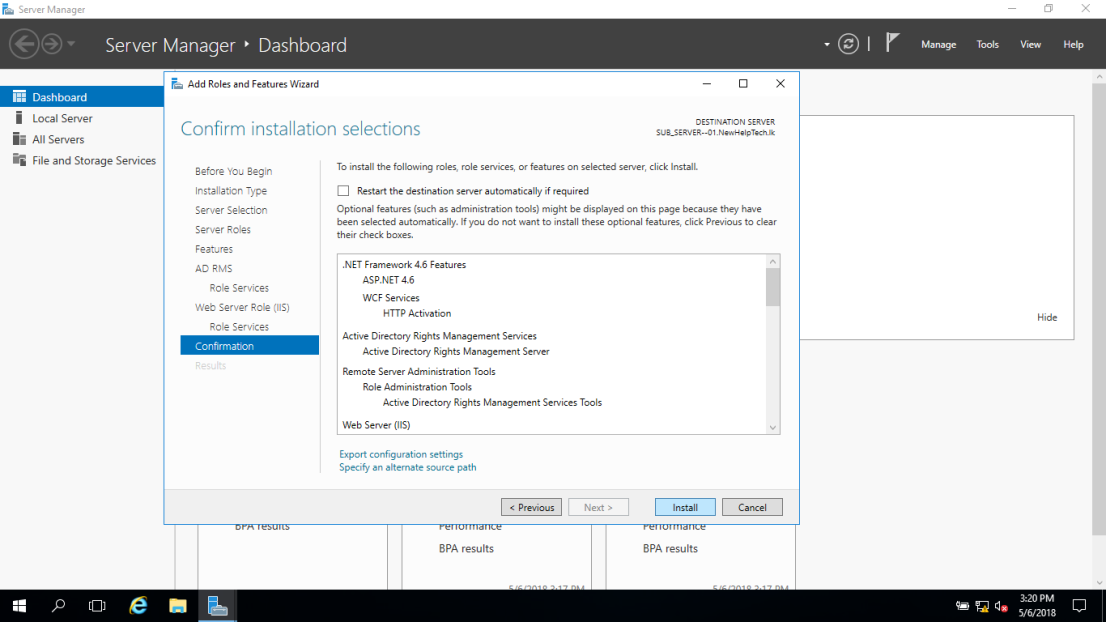
Open the Server Manager, click Manage, and then click Add Roles and Features, in the Add Roles and Features Wizard, click Next 3 times.

9 – Then click Next 4 times.
10 – Next, click Install to proceed.
11 – Click Close when installation successful.


12 – Next, on the All Servers Task Details page, click Perform Additional Configuration.

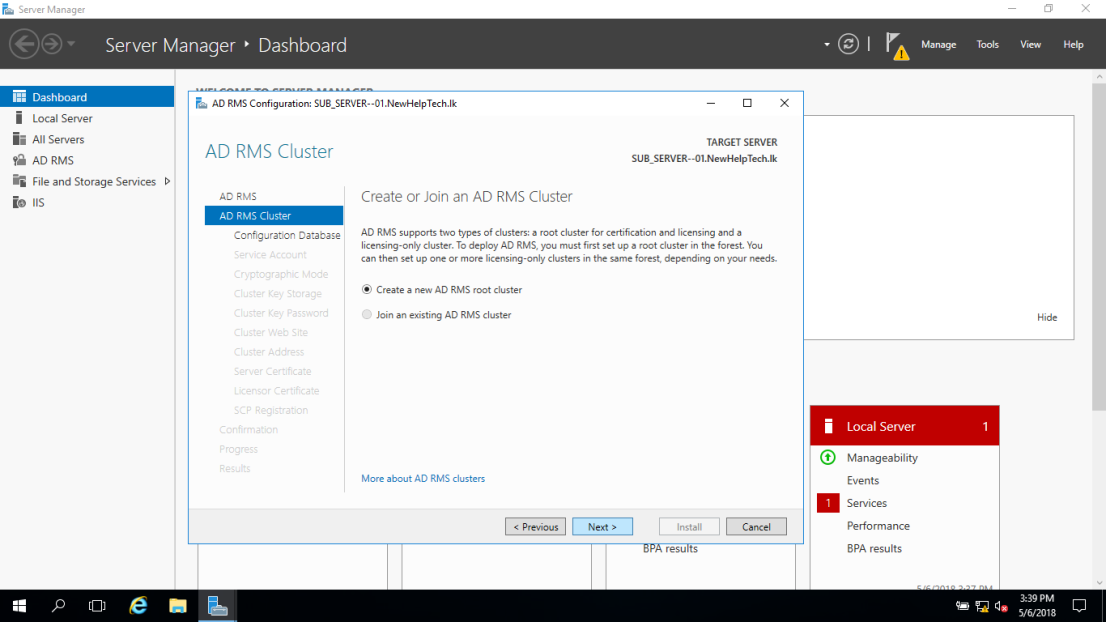
13 – In the AD RMS Configuration: SUB_SERVER-01.NewHelpTech.lk box, click Next.

14 – On the AD RMS Cluster box, click Create a New AD RMS root cluster, and then click Next.
15 – On the Configuration Database box, click Use Windows Internal Database on this server, and then click Next to proceed.

16 – On the Service Account page, click Specify, then in the Windows Security box enter ADRMSVC as a Username and enter the password, then click OK and Next.


17 – On the Cryptographic Mode box, click Cryptographic Mode 2, and then click Next.

18 – On the Cluster Key Storage box, click Use AD RMS centrally managed key storage, and then click Next.

19 – On the Cluster Key Password box, enter the password and then click Next.

20 – On the Cluster Web Site box, verify that Default Web Site is selected, and then click Next.

21 – On the Cluster Address box, provide the following information, and then click Next to proceed :
- Connection Type: Use an unencrypted connection
(://)Fully Qualified Domain Name: NewHelpTech.lkPort: 80

22 – On the Licensor Certificate box, type NewHelpTech ADRMS, and then click Next.

23 – On the SCP Registration box, click Register the SCP now, and then click Next to proceed.

24 – Click Install, and then click Close when installation successful.


25 – Next, open the Internet Information Services (IIS), Manager.

26 – In Internet Information Services (IIS) Manager, expand SitesDefault Web Site and click _wmcs, then under /_wmcs trang chủ, double-click Authentication.
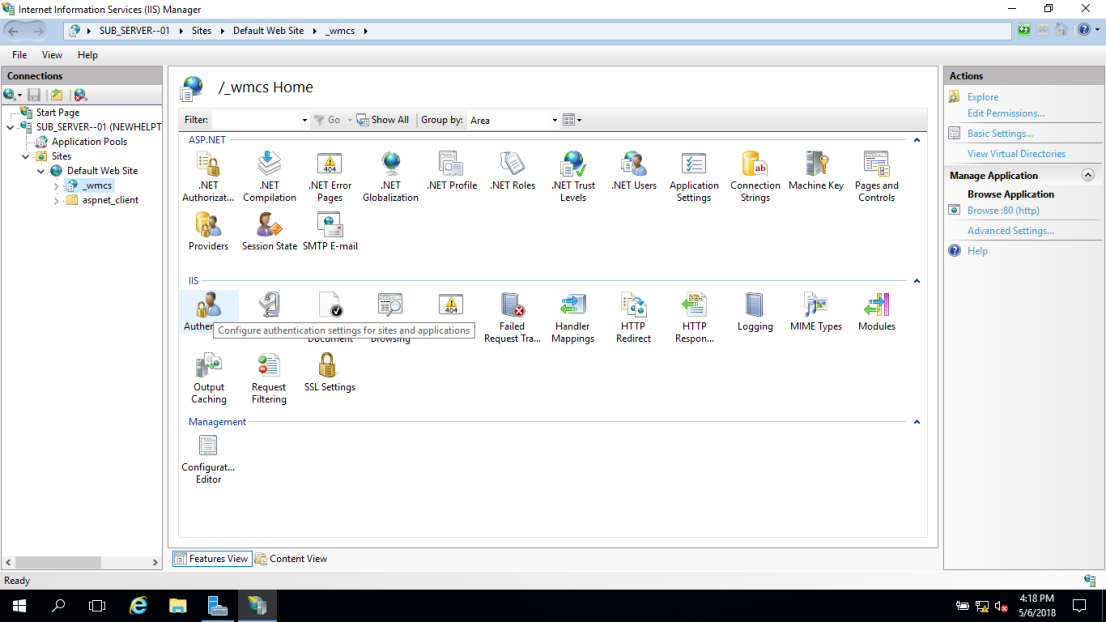
27 – Then right-click Anonymous Authentication and click Enable.

28 – In the Connections pane, expand _wmcs and click licensing and double-click Authentication.

29 – Right-click Anonymous Authentication and click Enable, then close IIS Manager.

“You must sign out before you can manage AD RMS”

Next, let’s configure AD RMS super users group for SUB_SERVER-01.
30 – In Server Manager, click Tools and then click Active Directory Rights Management Services.

31 – In the Active Directory Rights Management Services console, expand the SUB_SERVER-01 node and then click Security Policies.

32 – In the Security Policies area, under Super Users, click Enable Super User.
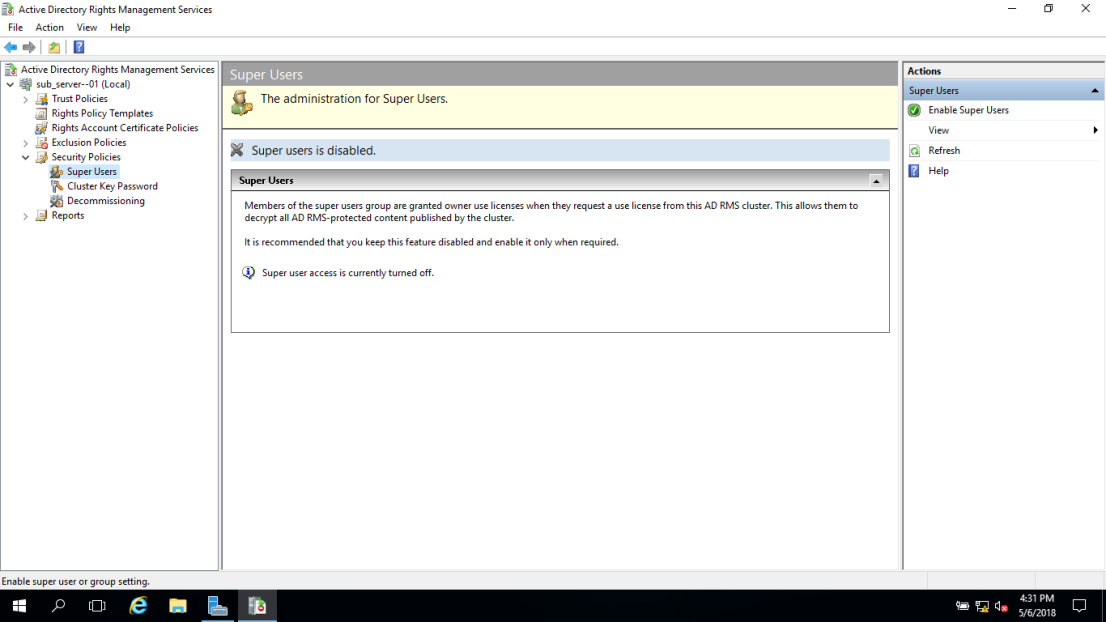

33 – In the Super Users box, in the Superuser group text box, type , and then click OK.


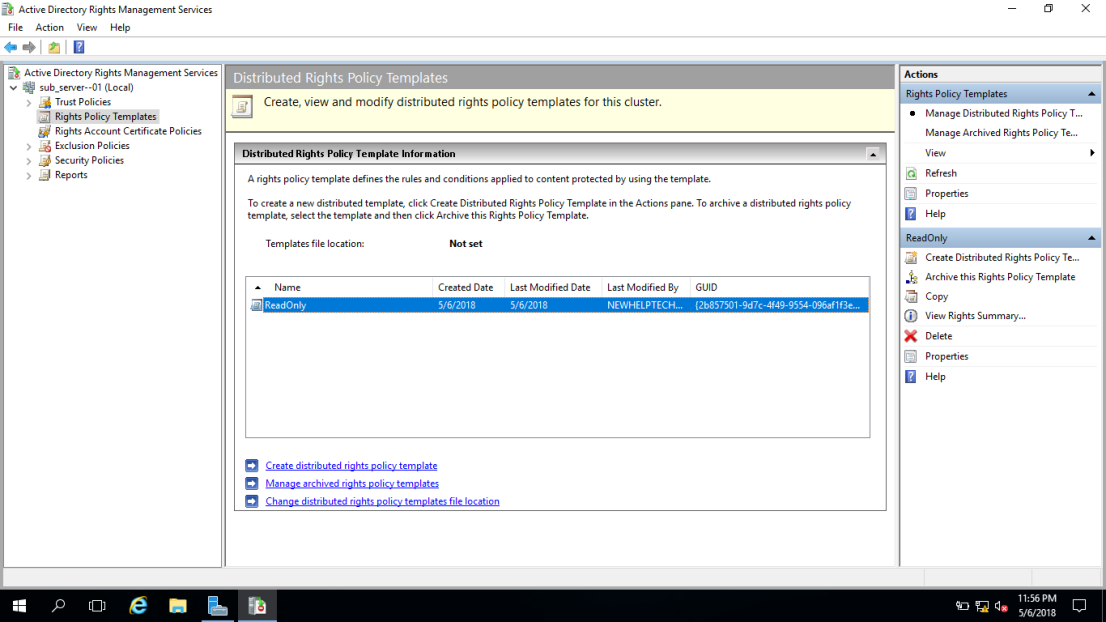
34 – Open the Active Directory Rights Management Services console, then click Rights Policy Templates node and then in the Actions pane, click Create Distributed Rights Policy Template.

35 – In the Create Distributed Rights Policy Template Wizard box, on the Add Template Identification information box, click Add.

36 – On the Add New Template Identification Information box, enter the following information and then click Add
and click Next to proceed.
- Language: English (United States)Name: ReadOnly


37 – On the Add User Rights box, click Add, then on the Add User or Group page, type and then click OK to proceed.


38 – When is selected, under Rights, click View. Verify that Grant owner (author) full control right with no expiration is selected, and then click Next.

39 – On the Specify Expiration Policy box, choose the following settings and then click Next:
- Content
Expiration: Expires after the following duration (days): 14Use license expiration: Expires after the following duration (days): 14

40 – On the Specify Extended Policy box, click Require a new use license every time content is consumed (disable client-side caching), click Next, and then click Finish.


“Next step, let’s Configure the rights policy template Distribution”
41 – On the SUB_Server-01, open Windows PowerShell, and type:
New-Item c:RMSTemplates -ItemType Directory

42 – Next, type:
New-SmbShare -Name RMSTEMPLATES -Path c:RMSTemplates -FullAccess NewHelpTechADRMSVC

43 – Next type:
New-Item c:DocShare -ItemType Directory

44 – Next type:
New-SmbShare -Name docshare -Path c:DocShare -FullAccess Everyone

45 – Open the Active Directory Rights Management Services console, click the Rights Policy Templates node, and in the Distributed Rights Policy Templates area, click Change distributed rights policy templates file location, then in the Rights Policy Templates dialog box, click Enable Export.


46 – Next, in the Specify Templates File Location (UNC), type \SUB_SERVER-01RMSTEMPLATES, and then click OK.

47 – Next, open Windows Explorer and navigate to the C:rmstemplates thư mục, and verify that ReadOnly.xml are Present.

Now, you have successfully configured AD RMS templates.
Verifying AD RMS Client
1 – Switch and sign in to CLIENT-01 as NewHelpTechA.

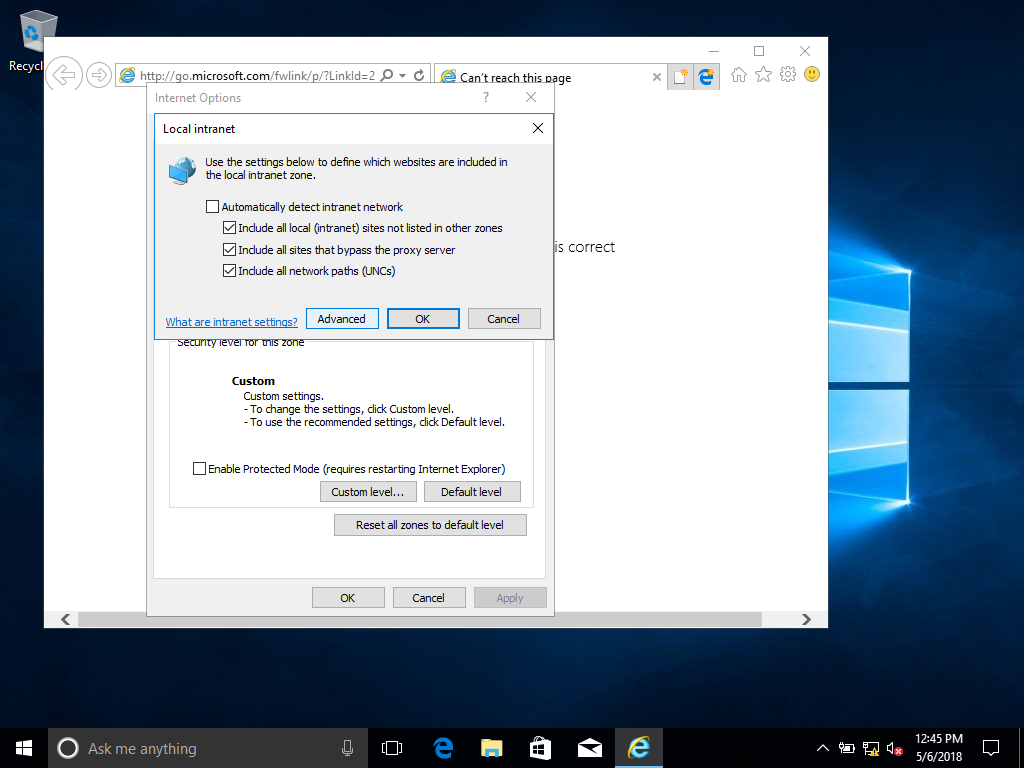
2 – Open the Internet options, click the Security tab, click Local intranet, and then click Sites.

3 – Click Advanced, type ://NewHelpTech.lk in the Add this website to the zone and then click Add.

4 – Open a blank Word 2022 document and then type a Descriptive message in the document.

5 – Click Protect Document using the File tab and navigate to Restrict AccessRestricted Access then Connect to Rights Management Services.

6 – Select the Restrict permission to this Document checkbox in the Permission dialog box, and then type in the Read text box.
7 – Type [email protected] in the Change text box.
8 – Click OK to close the Permission dialog box.
9 – Switch user as NewHelpTechB and open File Explorer, and then browse to \SUB_SERVER-01ADMSV.
11 – Try to open the Test.docx file. Notice the message that displays.
12 – Click View Permission and verify that B user has the view permission.
Good luck! Just give it try – I’m sure you’ll love it as well. If you have any comments or questions on feel không lấy phí to contact me.
That’s all for now. 🙂
Which of the following is a feature that allows non domain joined devices to access claims based resources?
Device registration is a feature that allows nondomain-joined devices to access claims based resources securely.Which option will allow private keys to be locked away and then restored if the user's private key is lost?
By using key archival, private keys can be locked away and restored if the user's private key is lost.What tool can a user use to request certificates that are not configured for autoenrollment?
Users can request certificates that aren't configured for autoenrollment by using the Certificates snap-in.Which of the following is the first step to allow third party devices to perform device registration to access domain resources from the Internet?
Which of the following is the first step to allow Third-Party devices to perform Device Registration to access Domain Resources from the Internet? Install a Certificate from a Third-Party CA. Tải thêm tài liệu liên quan đến nội dung bài viết What are the expiration policy options you can specify for content in a rights policy template?