Thủ Thuật Hướng dẫn Remote Desktop aspect ratio Chi Tiết
Hoàng T Thu Thủy đang tìm kiếm từ khóa Remote Desktop aspect ratio được Cập Nhật vào lúc : 2022-03-04 08:57:05 . Với phương châm chia sẻ Mẹo Hướng dẫn trong nội dung bài viết một cách Chi Tiết 2022. Nếu sau khi Read tài liệu vẫn ko hiểu thì hoàn toàn có thể lại Comments ở cuối bài để Tác giả lý giải và hướng dẫn lại nha.
The 1440×900 máy tính issue is quite common. yes, you could choose a smaller resolution, say, 1024×768 or 800×600, and they would yield acceptable results – if what you’re seeking is to avoid scroll bars withing the RDP instance itself.
Nội dung chính
- Remote Desktop Connection SettingsCreating an RDP FileEditing the Screen Resolution Size Within the RDP FileVideo liên quan
Must more convenient is to choose to use your current desktop resolution, but in many clients this will yield less than desirable results (You get the scroll bars) unless you toggle full screen.
To have your RDP client (Since we appear to be talking about MSTSC.exe here) session occur in a window itself, while avoiding the scroll bars (or the afore mentioned resolutions which are less than optimum), the /h:900 /w:1100 parameters suggested above are a great starting point, but with all things YMMV, so play with it until you get it just so 😉
Many RDP clients also allow you to set a ‘custom’ res just prior to connect, and yes, most clients will remember your last sessions.
One major thing you should be aware of. For all of us UNIX folks, we’re going to be using things like vcenter, putty, etc., in our remote windows sessions, and whatver you want to call your DOS-like consoles, well… They don’t follow the same set of rules as the rest of your desktop, so just make a note of that when setting your resolutions, and set your preferences according to how nicely the Windows desktop fits into your workspace, because you’re just going to have to get used to moving those DOS-like windows about, as they’ll always be a bit clunky.
You can also set 24bit color with a hack, because it’s disabled by default, although there’s really no need for most folks, and although some people like to disable printing, I find that using remote apps and printing locally via RDP is not only a dream, but part of my regular tasks on a daily basis.
so remember, if you’re local res is 1440×900, you either need to run your RDP client in full screen mode (appears as if it is your local desktop), or, in order to run it as an obvious windowed app, you’ll need to adjust your custom screen resolution to something slightly smaller, which will yield a window about the size of your entire desktop, but without appearing as if it is your local desktop – this is what many prefer, as they find it confusing otherwise.
I hope that helps 🙂
DUDZIAKKrzysztof-4337 asked • Jun 10, ’21 | LeilaKong-MSFT answered • Jun 17, ’21
I will use Windows behavior presented shortly this paragraph in problem description subsequent paragraphs in order to present the problem. Let’s place some documents or apps icons desktop right and bottom edges.If for some reasons Windows needs to switch to lower screen resolution it is replacing
those icons to area which insures those icons visibility screen new resolution.
There is Windows 10 machine version 1909, a tower in stationary use.Physical screen attached to it has resolution of 1920×1080.User placed on Desktop some icons screen right and left edges.Desktop background picture has a pattern with no till just bit of symmetries,
this helps to get feeling how desktop graphical composition works.
Let’s connect now to that Windows 10 machine through RDP.As RDP client a máy tính and identical Windows 10 version is used.Laptop physical screen has identical resolution as stationary machine physical screen. DPIs might be different.
Remote desktop session runs in full-screen mode, no scaling is used.
PROBLEMWhen in remote desktop session the remote station desktop icons placement is different than on remote station local screen (position of those icons is different).Icons in desktop right and bottom areas are relocatedas RDP would had switched to lower resolution than remote and client localnative screen resolution. How to achieve same desktop composition as
for client and remote local native display resolution?
remote-desktop-servicesremote-desktop-client
Comment
This article provides a solution to an issue where you can’t maximize a Remote Desktop Connection session window to full-screen when you use the Mstsc /v command.
Applies to: Windows 7 Service Pack 1
Original KB number: 980876
Symptoms
When you connect to a remote computer by using the Mstsc command-line tool together with the /v parameter in Windows 7, you can’t maximize the window of the session to full-screen.
Cause
This issue occurs if the display setting in Remote Desktop Connection was changed from the default setting (Full Screen) to a different setting. This setting change is saved in the Default.rdp file. When a connection starts by using the /v parameter, the display setting that is saved in the Default.rdp file is used.
Resolution
To resolve this issue, change the display setting in Remote Desktop Connection to full-screen by following these steps:
Click Start > All Programs > Accessories > Remote Desktop Connection.
In the Remote Desktop Connection dialog box, click Options.
Click the Display tab.
Move the Display configuration slider to Large (Full Screen), and then connect to the remote computer.
When you now connect to a remote computer by using the /v parameter, you can maximize the window of the session to full-screen.
Overview: A quick tip about how to get the resolution of a Remote Desktop session just right for your monitor, so you don’t have to giảm giá with scrollbars.
Level: Familiarity with Remote Desktop is assumed.
The screen shots shown below are from a Windows 7 machine.
Remote Desktop Connection Settings
When you launch Remote Desktop, you are initially presented with a very simple window:
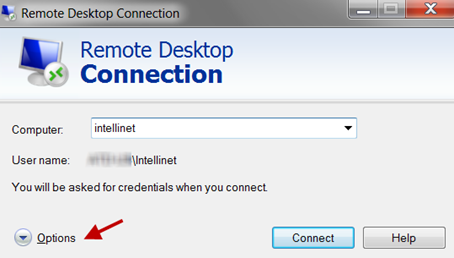
To get to all the good stuff, we need to expand the Options. Now 6 tabs are displayed:
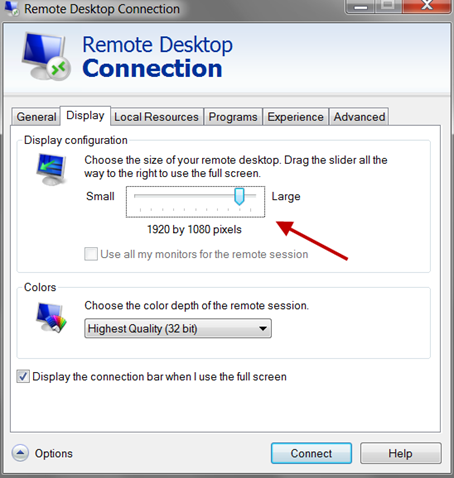
On the Display tab, you find the standard screen resolution settings. This is great, but sometimes you need a screen resolution that’s just a little bit different than what’s offered on the slider. For now, just select the resolution that is closest to what you want:
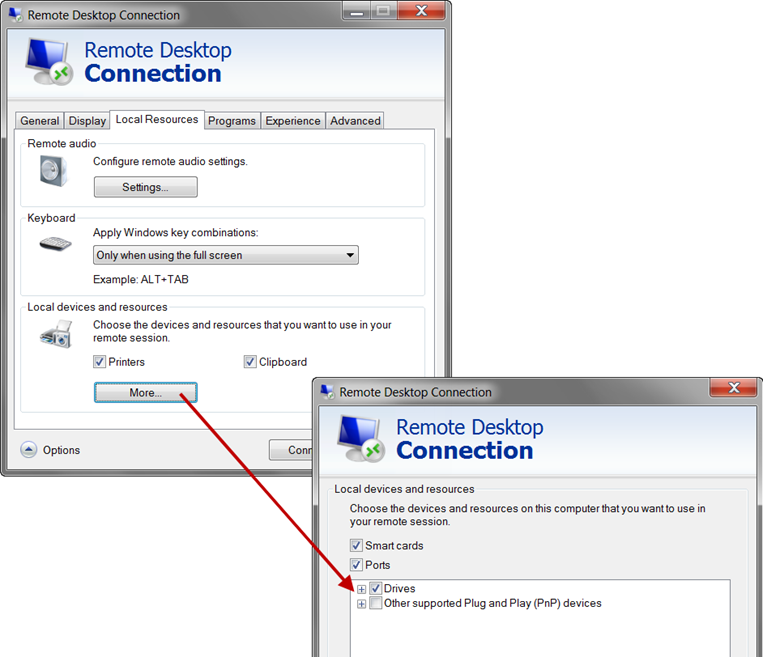
Let’s do one more thing that’s not related to screen resolution before we finish. On the Local Resources tab, choose to have your Printers, Clipboard and Drives available. Under Keyboard, you can also control whether an ALT+TAB works on your primary machine or the remote desktop session (boy did that drive me nuts till I discovered that setting a while back!).
I usually don’t change anything on the Programs, Experience, or Advanced tabs.
Creating an RDP File
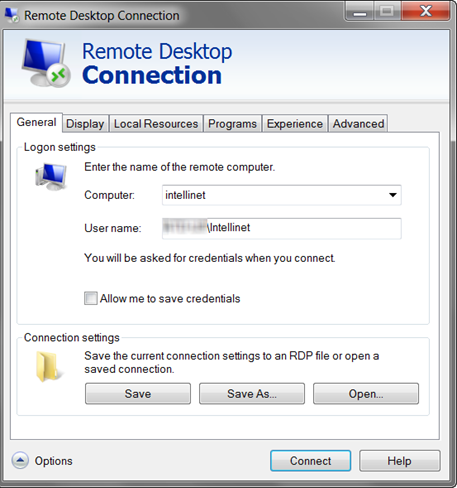
Let’s return to the General tab. Note the Save and Save As buttons:
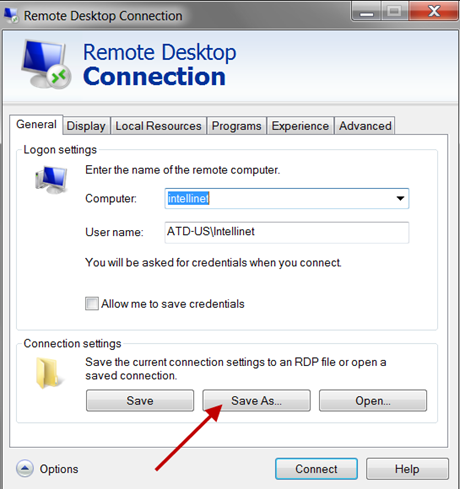
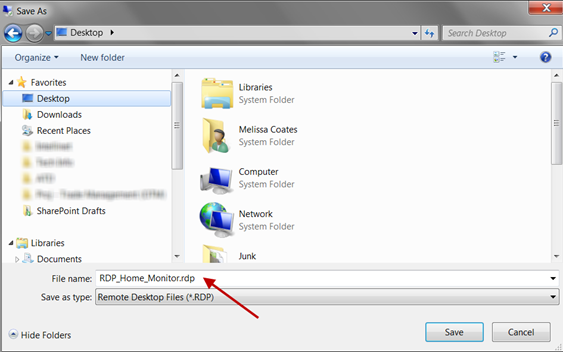
The Save As button will prompt you for the location of a RDP (Remote Desktop Protocol) file. I find that using the Desktop is a perfect location for this file – because you’ll actually launch Remote Desktop from this file after it’s set up. Note in the following screen shot that I put “Home_Monitor” in the name:
Editing the Screen Resolution Size Within the RDP File
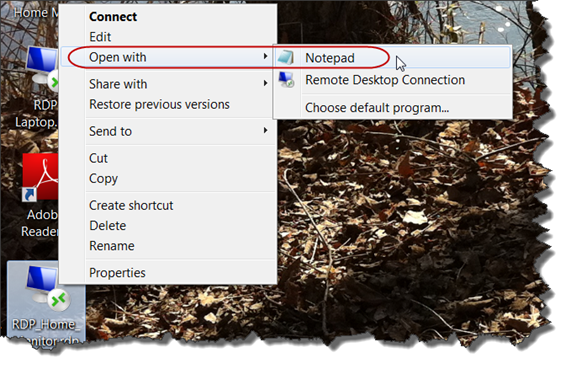
Go find the file you just saved; right-click it and choose to open with Notepad (or the text editor of your choice).
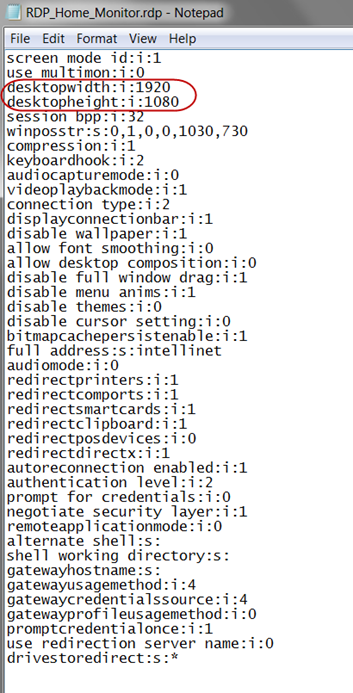
After you open the file in Notepad, see the screen resolution settings near the top (which came from the Display tab). Here’s the fun part – you can adjust the “desktopwidth” and “desktopheight” to the precise pixel settings you want. For example, I have one RDP file I like to use which is set to 1890×1000.
On my desktop currently, I have two RDP files which connect to Client ABC: one file which is set to my optimal máy tính resolution, and another file which works better with my extra monitor home. Depending on how & where I want to work the time, I use the appropriate RDP shortcut on the desktop to launch the Remote Desktop session. Note that the file is specific to one connection.
Here’s to no more scrollbars!

Video Remote Desktop aspect ratio ?
Bạn vừa đọc Post Với Một số hướng dẫn một cách rõ ràng hơn về Review Remote Desktop aspect ratio tiên tiến nhất
Share Link Download Remote Desktop aspect ratio miễn phí
You đang tìm một số trong những Share Link Cập nhật Remote Desktop aspect ratio miễn phí.
Giải đáp thắc mắc về Remote Desktop aspect ratio
Nếu sau khi đọc nội dung bài viết Remote Desktop aspect ratio vẫn chưa hiểu thì hoàn toàn có thể lại Comments ở cuối bài để Tác giả lý giải và hướng dẫn lại nha
#Remote #Desktop #aspect #ratio – 2022-03-04 08:57:05